Monday, October 30, 2017

An Adornit Birthday Card...


Hi friends!

I was recently away and I took one of my AdornIt mini coloring books and some watercolors with me and played during my free time. I colored this cute image with yellows and greens and figured I'd make it into a card someday. Little did I realize that it was perfect for a friend's upcoming birthday because the little yellow circles look like tennis balls and she loves tennis. Serendipity! I created a stand up card (with the technique I outlined recently) with some AdornIt paper and a few tennis stickers and it came out so cute. She loved it!

So, moral of the story, color away and you might just create the perfect card with your image at some future date!

Thanks for visiting. Have a great, crafty day!


Monday, October 23, 2017

Thanksgiving Stand Up Card

Hello friends,

Just posting a little Adornit fun here. This time, a card that folds flat but can stand up once opened. I used a coloring sheet from the Love and Faith mini coloring book and colored pencils. Here are the steps I used to make the card:

1. Cut your solid card stock into 3 panels:
4-1/4 in x 11 in
4-1/4 in x 5-1/2 in and
4-1/4 in x 2 in
Cut your patterned paper into 3 panels:
4 in x 5-1/4 in
4 in x 1-3/4 in
4 in x 3 in
Score the long card stock piece at 2-3/4 in and 5-1/2 in marks. Crease as shown.


2. Glue the the largest and smallest pattern pieces to the card stock mats.


3. Turn over the small matted piece and add a foam pop dot to each corner.


4. Adhere the panel to the bottom of the long card stock panel (on the opposite end of the creased areas.)


 5. Glue down the leftover patterned paper panel to the inside of the card as shown.


6. Make crisp crease lines in top of card.


7. Adhere colored and trimmed down coloring page to large matted panel. Add greeting.


8. Add adhesive to top of folded card.


9. Place decorated panel on top of folded panel, making sure that the top edges of both panels meet.


10. Side view of card should now look like this.


11. Swiveling the top panel back should allow it to lock in place behind the raised smaller panel at the bottom of the card, so that the card now stands like an easel.


12. You can use the lower portion to add a greeting as shown. But the inside can also be used for a note.

13. Swivel again and the card can fold flat and be mailed in a standard A2 envelope.                            


I hope you are now inspired to try your hand at this card style.

Happy Crafting!

Saturday, October 14, 2017

Tick, tick, tick


Hello!

I've got another easy Adornit project for you today. Who doesn't want a clock that compliments you every time you look at it? Lol. I chose a cute paper with lots of sayings like "Hello Gorgeous" that can't help but brighten your day.

I've outlined what I did below and, you know what? You could use this as a stepping stone for your creativity. You may want to run with it and add lots more embellishments. I say, go for it! (Just steer clear of the moving parts.) I kept mine plain and simple, so that the steps are a breeze to follow.

1. Choose your paper (mine is Adornit's Viva La Glam) and turn it upside down. Place your Adornit wooden shape (with a hole that you previously drilled through the center) on top and lightly trace around the shape with a pencil.

 2. Cut carefully around the traced image.
 3. Mark the hole, then remove the shape and snip through the paper where the hole is marked.
 4. Apply your favorite adhesive to the wooden shape and glue down your paper. (Next time, I'd choose a different adhesive because mine was so tacky, it dried lumpy! Learn from my mistake!)
5. I used a soft brown ink to add a little aging to the edges of the shapes.
 6. Decide on your numbers. They could be the little gold ones included in the clock set or stickers or cut from paper. I cut mine from a sheet of Adornit's Blender Basics paper pack and adhered them to the surface.
 7. I picked up a clock parts set from my local craft store. (Be sure to coordinate the size hole you need for your wooden shape with the size of the clock stem.)
 8. Add your clock parts according to the instructions and add a battery. Voila! Either put it on a wall or, as I did, perch it on an easel.


 I hope you try this out. So fun and so easy. Let me know!


VW Van Fun

Hello!

The folks over at Flora Fauna Clear created this adorable VW van metal die and it couldn't be easier to use. I first created my standing box card (see earlier post for instructions) using road atlas papers for the background and a golf calendar page for the sky behind the van. I cut the van from white card stock and that cool grungy red paper from Adornit's Blender Basics pad. I was going to cut silver metallic headlights when I realized that I had rhinestones exactly the right size. Serendipity!

The card is for someone turning 66, hence the reference to Route 66! I love doing tongue-in-cheek references in my cards....

Hope you enjoy!


Sunday, October 8, 2017

Another AdornIt card

Hello,

I used the same steps as outlined yesterday to create a standing box card for a birthday.


This time, I used two 3"x4" panels that I cut out of 12"x12" sheets of AdornIt Paintables called Birthday Surprise and Brave Paintable. The images are printed on heavy paper that takes all forms of coloring tools (I used watercolors). The festive paper you see just behind the floating images be found here on the AdornIt site and the paper used for the card base and envelope was from their Blender Basics pack. Lots of cool designs in multi colors.

Thanks for dropping by. I hope you're inspired to check out the AdornIt site!

Friday, October 6, 2017

I'm an AdornIt Ambassador!

Hello friends!

Did you think I was long lost? Sorry, I'm over at Instagram as @scrapcollectr and I've been doing lots of posting over there. But now I'm an AdornIt Ambassador so it's my job to show you some cool projects that I make using their products and I'll be doing that here and on Instagram. Cool?

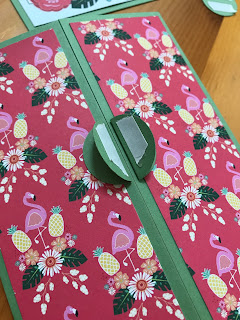
Today, I have a standing box card that I made for my in-laws 73rd anniversary! Yes, you read that right. While AdornIt has great images on watercolor paper that you can paint yourself, I chose to use their "Cut Apart" patterned paper that has images that are colored and can be cut apart into 3 inch x 4 inch panels.

Here's what I did:

1. I chose a cute flamingo theme for the cut aparts and coordinating patterned paper as a background.
 2. I chose a soft green card stock and cut it down to 5-1/2" x 8-1/2". Then cut my patterned paper into 4 panels measuring 1-7/8" x 5-1/4" each.
 3. I cut mats from the green card stock measuring 3-1/4' x 4-1/4" for each of the two images I cut out for my card. I also cut a 1" x 5-1/4" panel from the green card stock, as well as four - 1" circles.
 4. I used my DYMO label maker to create a label reading "lovebirds" (to put on the front of my card.)
 5. I used my scoring tool to score a line through the center of the 1" strip and the center of each circle.
 6. Then I scored my card panel along the long side at the following measurements: 2-1/8", 4-1/4" and 6-3/8". This creates 4 equal sections on the card.
 7. Crease at all the score lines on the card, strip and circles.
 8. Adhere the images to their green mats, and add paper tape to both sides of center line on each circle and the strip. Add "lovebirds" label to image that will be on front of card.
 9. Adhere all patterned panels to each of the 4 sections of the card base.
 10. Expose adhesive on one side of strip and start to align it with one edge of decorated card base.
 11. Adhere the card base over the strip by making sure they meet precisely at the center of the strip.
 12. Fold that flap over so that the card base will meet in a gate fold.
 13. Expose the adhesive on the remaining paper tape.
 14. Gently press down the right side of the gate fold so that it adheres to the tape.
 15. Take two circles and expose the adhesive on one side of each center line.
 16. Fold the circles in half and adhere each circle's sticky side to the center of the card making sure that the half circle meets the center score line of the card precisely but does not cross over the score line! This is going to be how your image will float in front of box card.
 17. Expose the adhesive on the folded circles by removing the paper on the tape, being careful that they do not adhere to each other!
 18. Take your matted image panel....
 19. ...and gently press it down onto the sticky folded circles, making sure that you place your image in the center of the card.
 20. Repeat steps 15-19 to adhere your second image that will be on the back of your card.
 21. With a gentle squeeze of the card, you now have a standing box card. Here is the front.
 22. And here is the back.
 23. Don't forget to take another sheet of coordinating paper and make a pretty A2 envelope for your card (which folds flat for mailing!) I love my We R Memory Keepers Envelope Maker for times like this!
 24. After I was done, I added a little sparkle to the front image with my Kuretake Wink of Stella pen in clear.


I hope you liked this tour. Once you've done this type of card several times, it will be so easy to whip up for all your card needs!

Be sure to check out AdornIt.com to see all the cute products they sell. You can find this flamingo line by clicking on "Papercraft" then "Paper Collections." Have fun shopping!